
![]() sing
artists inks for shading and special effects can produce some
rather striking results on your kits.
sing
artists inks for shading and special effects can produce some
rather striking results on your kits.
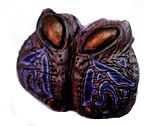
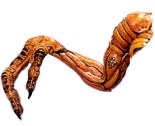
I used Windsor Newton brand inks for the effects you see on the Woman Bee and the Wind Slasher. They are sold in small bottles, for around $2 or $3 each, and can usually be found at craft stores and Art supply shops. The inks come in a wide range of colors. They even offer metallic shades in Silver and Gold. (Sounds like a Burl Ives song doesn't it?) Anyway, the inks contain a shellac base used for a binding agent, so they will dry with anywhere from a light sheen to a really glossy finish. If this effect is not desirable, the inks may be overcoated with a flat varnish. The inks are waterproof when dry, but can be thinned with water before application. Clean up consists of washing your brush with clean water.
I use the inks as "glazes" over the top of the highlighted acrylic paint. I use them to intensify the colors used, as well as to tone down the effects of drybrushing and blending. You can also use them as a wash, to produce your deeper shading tones. The inks are transparent, so they are perfect for these techniques. The inks also have the characteristic of changing the tint of any color layed over the top of them. This can be used to your advantage, but can also get to be a pain if you're trying to get a pure white, as you'll find your nice white turning green or some other color! This can be avoided by sealing the kit prior to painting over the inks.
I'll explain my use of inks on the Woman Bee. Inks were used on all parts of her "armor". The exact colors were Nut Brown, Orange and Sunshine yellow. I started with a basecoat of Orange-Yellow Liquitex acrylic. I then laid the deep shading tones in the crevices with a mix of Nut brown ink and Burnt Umber acrylic, feathering that into the orange-yellow. Once dry, I washed the surface of the armor with Nut Brown ink. I then added a bit of White to the Orange-Yellow basecoat, and blended the mix in by laying the color down, and then blending with the basecoat color while the paint was still wet. You need to be quick of hand to do this. You can also use an acrylic extender if you find the paint drying too fast. Do the next step in stages, a little of the armor at a time. Once all the highlights were blended in, I started in with the orange ink, laying in a midtone for the armor. Do not cover the highlights at this time, but try to get a nice fade into the darker areas of the armor. While the orange ink is still wet, cover the highlighted areas with the Sunshine yellow ink, working it until the hard edges between the orange and yellow ink disappear. What you should now have is a bright yellow highlight fading into a darker shade of the base color. You can also use this technique to do eyes (Vampu), teeth (Fluffy) and Flesh (Split Second Demon).
I could go on and on and bore you to tears with the different effects you can achieve with the inks, so I believe I'll stop here. Give the inks a try, and with a little bit of experimentation, you should be pleasantly surprised at what the inks will do for you.
The Gremlins in the Garage webzine is a production of Firefly Design. If you have any questions or comments please get in touch.
Copyright © 1994-1997 Firefly Design.