
Begin by basecoating the entire mouth with your gum color. Horizon's pink burgandy is an excellent choice for most figures. Redish browns or even shades of gray can be used for that diseased gum look that only comes from years of dipping into the Skoal. Drybrush any gum textures and follow up with a shading wash if you like. It's easiest to do this coarse work now before you paint the teeth.
For the lip area surround the gums, I usually prepare a wash of the gum color, and gently apply it around the mouth. You should end up w/ the darker color at the gums, slowly fading into the fleshtone as you move out of and around the mouth. Do this even if you'll be applying makeup to the figure later, because lipstick seldom covers every bit of this area near the mouth.
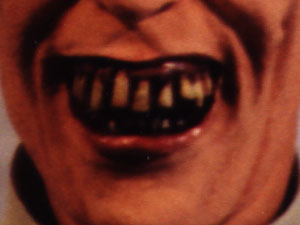
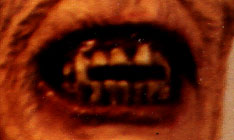
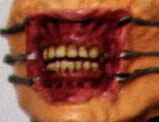
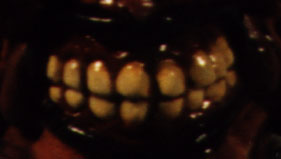
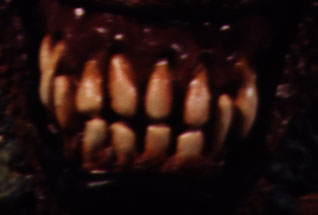
Once the gums are finished, you're ready to cut in the teeth. One mistake that beginners make is to simple paint all the teeth at once. It's important to paint each tooth individually so that the gums surround each tooth. There should be a crisp, thin, line of pink between each tooth when you are done. I basecoat my teeth with Polly-S Frost Ivory using an appropriately small brush and a steady hand.
Now that the teeth are blocked in, your mouth should start to come alive. Still, those teeth probably don't look quite right, especially if you're working on a monster. I don't think there have been many official studies, but it's fairly common knowledge that monsters seldom brush or floss. To simulate this appauling lack of oral hygine, we need to paint in some plaque!
At this point I prepare a wash of Polly-S Canine Yellow Brown, it's a light Sienna-type color. I begin by applying the wash around the root of each tooth. Pull the wash up along each tooth. The result should be a yellowish stain around the base of the tooth that fades as you near the tip. The tip of the tooth can by either the original ivory color, or more yellowed depending on your preference and how thickly you have applied the wash. If you find that you've applied the wash too heavily, you can always drybrush some of the ivory back on the tooth very lightly.
That's the basic recipe for teeth, and it's applicable to a great many characters and monsters. All figure kits should have plaque to some extent, well maybe not if you're working on a kit of Pamela Anderson. Still, some monsters may need a little extra kick to put them over the top. A buddy of mine who works at a dental lab has had the dubious honor of working on replacement teeth for zoo specimens. He noted that all of the so-called "blood beasts," lions, tigers, etc. have an orange cast to their teeth, presumably blood stains that have worked into the enamel over time. When I'm working on a critter that's diet is somewhat questionable, I'll finish up the tooth with a very thin wash of orange over the plaque work I've already applied. The end result is fairly convincing!

So that's it in a nutshell! The same technique for painting individual teeth is equally applicable for nails. For normal humans, you will want to replace the canine yellow wash with a wash of fleshtone. The wash should be more uniform over the entire nail, with only the edge of the nail left in the base ivory color. For talons or claws, you might want to try following the tooth procedure exactly, even down to the finishing orange wash. Of coarse if your kit came with a set of Lee Press-on Nails, then this discussion is entirely academic!
One last thing that probably doesn't need to be mentioned, but I will anyway for the benefit of beginners; you should seal your paintjob on the mouth and nails with a generous gloss coating. Fingernails tend to have a semi-gloss sheen to them, while the mouth should look wet when finished. I usually brush in Polly-S gloss coat as a finishing touch on a completed kit.
The Gremlins in the Garage webzine is a production of Firefly Design. If you have any questions or comments please get in touch.
Copyright © 1994-1997 Firefly Design.