
* By "bunch," I DON'T mean a huge section. For best results, you should take it slow, and apply hair in small quantities. It's a fairly tedious process, but the results can be terrific!
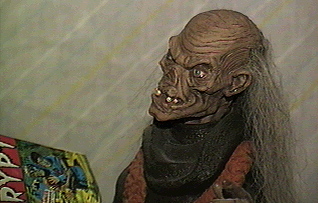
Now you're ready to affix a clump of hair to the figure. I've affixed hair a couple ways now. When I did the cryptkeeper, I used rubber cement to affix the hair. It was messy, and as long as I took care to lay the hair down carefully it was not noticeable. Of course rubber cement is NOT intended to be a permanent bond and it can/will peal up on you. As such, I don't recommend it.
A better solution is to go buy a bottle of Liquitex Matte Medium at an art supply store. This is the same stuff that David Fisher uses to make glazes, so you'll have an extra use for it if you want to give that technique (described in AFM #3 and Model Mania v. 2) a try.
Simply brush some of the medium onto the bunched up end of the hair clump and onto the head and press the hair in place. You may have to brush on a little more medium to get it to stick. Also, brush away any excess medium from the surrounding scalp area. As you apply it, it will look milky white. You'll be tempted to groan and say, "I've ruined it!" Fear not, it dries clear. The resulting bond is fairly strong, and will withstand a SMALL amount of tugging to reposition and trim strands.
Work your way around the head, laying longer clumps in first. Think about how YOUR hair parts along the scalp, and lay the clumps accordingly. Eventually, place shorter clumps around the ears and forehead. Take your time, and give the clumps plenty of time to dry. You'll want to gently pull the hair around to find out where you need to put more in. It's important to identify thin or bald spots - unless you want them there!
After you've gotten decent coverage, it's time for a trip to the barber's! Yes, garage kits need hair cuts too! Use a pair of scissors to trim the hair to the desired length. I usually call in my wife at this point to give me styling tips and pointers. (Yes, even the Cryptkeeper needs styling!)
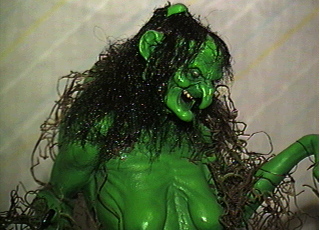
When you are completely happy trimming, adding, or rearranging the hair, I recommend hitting the whole thing with a light coat of lacquer. This will further bond the hair to the scalp. Make sure to use a VERY light dusting motion. You don't want to mat the hair down, nor do you want to "blow" the hair out of place. In the case of Dimensional Design's Swamp Witch, I applied multiple heavy coats of gloss lacquer, since I was after a wet matted look.
The Gremlins in the Garage webzine is a production of Firefly Design. If you have any questions or comments please get in touch.
Copyright © 1994-1997 Firefly Design.